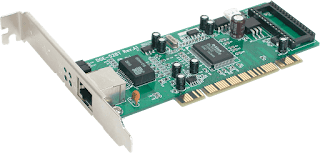
Install and Test Network Interface Card (NIC)

Aim : Install & Test Network Interface Card (NIC)
Description :- Network Interface Card (NIC) is a hardware component that is present on the computer. It is used to connect different networking devices such as computers and servers to share data over the connected network. It provides functionality such as support for I/O interrupt, Direct Memory Access (DMA) interfaces, partitioning, and data transmission.
- NIC is important for us to establish a wired or wireless connection over the network.
- Network Interface Card is also known as Network Interface Controller, Network Adapter, Ethernet card, Connection card, and LAN (Local Area Network) Adapter.
Types of Network Interface Card (NIC) :
- Ethernet NIC : Ethernet NIC was developed by Robert Metcalf in 1980. It is made by ethernet cables. This type of NIC is most widely used in the LAN, MAN, and WAN networks.
- Wireless Networks NIC : It is a wireless network that allows us to connect the devices without using the cables. These types of NICs are used to design a Wi-Fi connection.
- Step - 1 : First step is to read the user's guide and familiarize yourself with the new card.
- Step - 2 : Power down PC and remove the AC power cord.
- Step - 3 : Open the computer case.
- Step - 4 : Find an available Peripheral Component Interconnect (PCI) slot on the motherboard and remove slot insert if one exists.
- Step - 5 : Carefully remove the network card from its static-proof plastic envelope, and slide it into the slot.
- Step - 6 : Seat the card in the slot firmly with gentle pressure along the length of the card, especially right about the slot itself.
- Step - 7 : Snugly, screw the card to the computer frame, but do not over tighten.
- Step - 8 : Close the computer case.
- Step - 9 : Plug your computer in and power it up and setup your newly installed NIC.
Test Network Interface Card (NIC) :
- Step - 1 : After installing NIC, plug your computer in and power on.
- Step - 2 : Open Control Panel
- Step - 3 : Open Device Manager and then choose Hardware and Sound. Then choose Device Manager link then Device and Printers.
- Step - 4 : Expand the Network Adapters item to view all network adapters installed on your PC.
- Step - 5 : Double Click the Network Adapter entry to display your pc's network adapter's properties dialog box.
- Step - 6 : Click the Resources tab in the Properties dialog box. Check the conflicting device list. You should see no conflicting listed.
- Step - 7 : Click ok to close the Properties dialog box.
- Step - 8 : Close the Device Manager Window as well as the Control Panel.
Advantages :
- As compared to the wireless network card, NIC provides a secure, faster, and more reliable connection.
- NIC allows us to share bulk data among many users.
- It helps us to connect peripheral devices using many ports of NIC.
- Communication speed is high.
- Network Interface cards are not expensive.
- NICs are easy to troubleshoot.
Disadvantages :
- NIC is inconvenient as compared to the wireless card.
- For wired NIC, a hard-wired connection is required.
- NIC needs a proper configuration to work efficiently.
- NIC cards are not secure, so the data inside NIC is not safe.
Useful Links :
Get this all Images in PDF format to stick in Practical File - click here
Referenced by :
Vikram Agrawal Sir
Lecturer in BBIT - V.V. Nagar, Anand.
Contact Number : 9727374744
Mail Id : agrawal.vm@gmail.com
Team B&B Institute of Technology, V.V. Nagar, Anand.


Comments
Post a Comment